In this article, you will learn how to screen record on your Samsung device. We will guide you through the step-by-step process, ensuring that you understand each instruction clearly. By the end of this article, you will be able to effortlessly capture your screen activities on your Samsung phone or tablet. So, let’s get started and master the art of screen recording on Samsung devices!

Table of Contents
- How To Screen Record On Samsung
- Using the Built-in Screen Recorder
- Accessing the Screen Recorder
- Starting a Screen Recording
- Pausing and Resuming Screen Recording
- Ending a Screen Recording
- Viewing and Sharing Screen Recordings
- Using Third-Party Screen Recording Apps
- Exploring Different Screen Recording Apps
- Downloading and Installing a Screen Recording App
- Using the App to Record Your Screen
- Comparing the Benefits of Third-Party Apps
- Customizing Screen Recording Settings
- Adjusting Video Quality
- Enabling or Disabling Audio
- Using External Microphones for Audio Recording
- Setting the Orientation and Aspect Ratio
- Selecting Output Formats and Locations
- Editing Screen Recordings
- Trimming and Cutting Sections
- Adding Captions and Annotations
- Applying Filters and Effects
- Merging Multiple Recordings
- Exporting and Saving Edited Recordings
- Transferring Screen Recordings to Other Devices
- Using Cloud Storage Services
- Connecting Samsung Devices with Smart Switch
- Using USB Cable or SD Card
- Transferring via Bluetooth or Wi-Fi Direct
- Troubleshooting Screen Recording Issues
- Fixing Crashes or Freezing
- Addressing Audio Syncing Problems
- Dealing with Low Storage Errors
- Resolving Playback Issues
- Updating Screen Recording Software
- Conclusion
How To Screen Record On Samsung
Screen recording on Samsung devices offers a versatile functionality for various purposes. Whether you need to record your screen for work, gaming, or other activities, there are different methods and options available. By following the outlined steps for both built-in and third-party solutions, you can easily unleash the power of screen recording on your Samsung device. Experimenting with various settings, editing tools, and sharing options can enhance your overall experience and productivity. So go ahead and start capturing and sharing your screen recordings with ease!
Using the Built-in Screen Recorder
Accessing the Screen Recorder
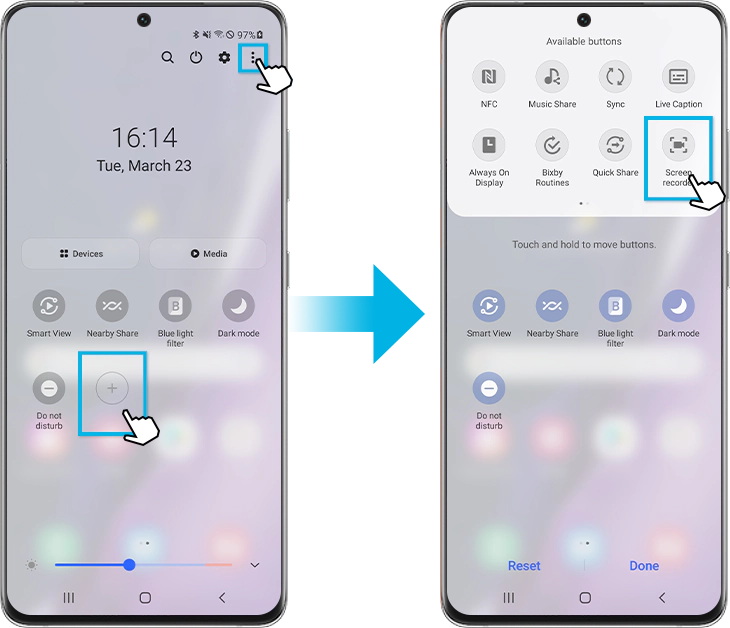
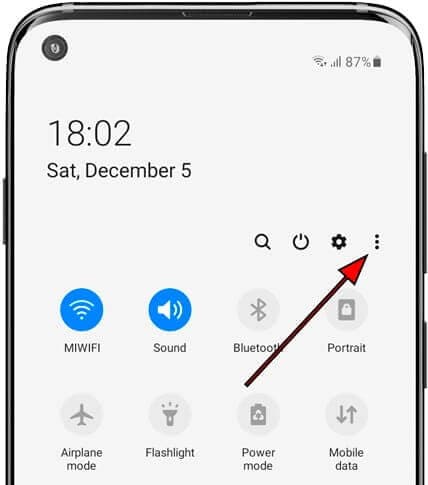
To access the built-in screen recorder on your Samsung device, swipe down from the top of the screen to open the notification panel. Then, locate and tap the “Screen Recorder” option. Alternatively, you can access it through the settings menu. Simply go to “Settings,” then navigate to “Advanced Features” and select “Screen Recorder.”
Starting a Screen Recording
Once you’ve accessed the screen recorder, simply tap the “Start Recording” button to begin recording your screen. You can choose whether to record the entire screen or just a specific portion by adjusting the recording area.
Pausing and Resuming Screen Recording
During a screen recording, you can pause and resume the recording as needed. Simply tap the pause button, which appears as a square icon, to pause the recording. To resume, tap the play button, which will replace the pause button.
Ending a Screen Recording
To end a screen recording, tap the “Stop Recording” button. You can also use the “Screen Record” notification in the notification panel to stop the recording.
Viewing and Sharing Screen Recordings
After ending a screen recording, you can easily access and view your recordings. Open the “Gallery” app on your Samsung device and navigate to the “Videos” folder. Your screen recordings will be saved there. From here, you can share the recordings via messaging apps, social media platforms, or cloud storage services.
Using Third-Party Screen Recording Apps
Exploring Different Screen Recording Apps
If you prefer additional features or advanced functionality, you can explore third-party screen recording apps available on the Google Play Store. Some popular choices include AZ Screen Recorder, Mobizen Screen Recorder, and DU Recorder. These apps offer a wider range of options, including video editing tools and customizable settings.
Downloading and Installing a Screen Recording App
To download and install a third-party screen recording app, open the Google Play Store on your Samsung device. Search for the desired app using the search bar, select it from the results, and tap the “Install” button. Once the installation is complete, open the app.
Using the App to Record Your Screen
After opening the third-party app, familiarize yourself with its interface and settings. Most apps function similarly to the built-in screen recorder, allowing you to start and stop recordings with the touch of a button. Explore any additional features offered by the app, such as video editing tools or live streaming capabilities.
Comparing the Benefits of Third-Party Apps
While the built-in screen recorder on Samsung devices provides basic screen recording functionality, third-party apps offer additional features and customization options. Some benefits of using third-party apps include the ability to record audio from external sources, apply filters and effects to recordings, and trim or cut sections of the recording. Consider your specific needs and preferences when deciding whether to use a third-party app.
Customizing Screen Recording Settings
Adjusting Video Quality
Both the built-in screen recorder and third-party apps allow you to adjust the video quality settings. Higher video quality will result in larger file sizes, so consider the available storage space on your device before selecting the highest quality.
Enabling or Disabling Audio
If you want to record audio along with your screen recording, make sure the audio option is enabled. You can choose to record audio from your device’s microphone or enable external microphone support for better audio quality.
Using External Microphones for Audio Recording
To enhance the audio quality of your screen recordings, consider using an external microphone. Connect the microphone to your Samsung device either wirelessly or using the appropriate adapter. Then, enable the external microphone option in the screen recording settings.
Setting the Orientation and Aspect Ratio
Depending on your recording needs, you can set the screen recording orientation and aspect ratio. Choose between portrait mode or landscape mode, and select the desired aspect ratio, such as 16:9 or 4:3.
Selecting Output Formats and Locations
Both the built-in screen recorder and third-party apps allow you to choose the output format and location for your screen recordings. Common output formats include MP4, MKV, or GIF. Select a location with sufficient storage space to save your recordings.

Editing Screen Recordings
Trimming and Cutting Sections
If you need to remove unwanted sections from your screen recordings, you can use video editing tools. Trim and cut features allow you to select specific start and end times for your recordings, removing any unnecessary footage.
Adding Captions and Annotations
To enhance the clarity and understanding of your screen recordings, you can add captions and annotations. Use text overlays, arrows, or highlighters to emphasize important information or guide the viewer’s attention.
Applying Filters and Effects
Some third-party screen recording apps provide filters and effects to enhance your recordings. These can be useful for adjusting brightness, contrast, or adding artistic effects to your screen recordings.
Merging Multiple Recordings
If you have multiple screen recordings that you want to combine into one video, you can use video editing software or apps. Simply import the recordings and arrange them in the desired order, then save the merged video.
Exporting and Saving Edited Recordings
After editing your screen recordings, you can export and save them in your preferred format and location. Most video editing tools and apps allow you to choose the output format and quality settings before saving the edited recording.
Transferring Screen Recordings to Other Devices
Using Cloud Storage Services
One convenient way to transfer screen recordings to other devices is by using cloud storage services. Upload your recordings to services like Google Drive, Dropbox, or OneDrive, and then access them from any connected device.
Connecting Samsung Devices with Smart Switch
If you want to transfer screen recordings between Samsung devices, you can use Smart Switch. This software allows you to transfer files wirelessly or using a USB cable, making it easy to share your recordings with other Samsung devices.
Using USB Cable or SD Card
For a direct transfer between Samsung devices or to a computer, you can use a USB cable or SD card. Connect your devices, enable file transfer mode, and manually copy the screen recordings to the desired destination.
Transferring via Bluetooth or Wi-Fi Direct
You can also transfer screen recordings wirelessly using Bluetooth or Wi-Fi Direct. Pair your Samsung device with the target device and select the recordings you want to transfer. Follow the on-screen prompts to complete the transfer.

Troubleshooting Screen Recording Issues
Fixing Crashes or Freezing
If the screen recorder crashes or freezes during recording, try restarting your device and closing any unnecessary background apps. If the problem persists, make sure your device’s software and screen recording app are up to date.
Addressing Audio Syncing Problems
Sometimes, audio may become out of sync with the video during a screen recording. To address this issue, try adjusting the audio settings or use a different screen recording app that offers better audio synchronization.
Dealing with Low Storage Errors
If you receive low storage errors while recording your screen, free up some space on your device by deleting unnecessary files or apps. Alternatively, you can choose a lower video quality setting to reduce the file size.
Resolving Playback Issues
If you encounter playback issues when viewing your screen recordings, make sure you have a compatible video player installed on your device. If playback problems persist, try transferring the recording to a different device or using a different video player.
Updating Screen Recording Software
To ensure optimal performance and access to the latest features, regularly check for updates for both your device’s software and the screen recording app you are using. Install any available updates to fix bugs and improve functionality.
Conclusion
Screen recording on Samsung devices provides a valuable tool for a wide range of activities. Whether you need to record tutorials, capture gameplay, or demonstrate your work, the built-in screen recorder and third-party apps offer different options and features to suit your needs. By customizing your screen recording settings, editing your recordings, and easily transferring them to other devices, you can make the most out of this powerful functionality. So start exploring and recording your screen on your Samsung device today!


