In this article, you will learn how to enable the Do Not Disturb feature on your iPhone. We will guide you through the process, step by step, so that you can easily find and activate this useful function. By the end of this article, you will be able to customize your Do Not Disturb settings according to your preferences and manage interruptions on your iPhone effectively. Let’s get started!

Table of Contents
- How to Enable Do Not Disturb on iPhone
- Understanding Do Not Disturb on iPhone
- Benefits of using Do Not Disturb
- Difference between silent mode and Do Not Disturb
- Enabling Do Not Disturb on iPhone
- Accessing the Control Center
- Locating the Do Not Disturb icon
- Enabling Do Not Disturb temporarily
- Enabling Do Not Disturb indefinitely
- Customizing Do Not Disturb Settings
- Setting a schedule for Do Not Disturb
- Allowing calls from specific contacts
- Allowing repeated calls to bypass Do Not Disturb
- Choosing to receive notifications only from favorites
- Configuring Do Not Disturb Options
- Activating Do Not Disturb while driving
- Enabling Bedtime mode
- Choosing to silence all calls except emergencies
- Setting quiet notifications during specific hours
- Managing Do Not Disturb Exceptions
- Adding emergency contacts to bypass Do Not Disturb
- Allowing repeated calls to ring through
- Configuring Do Not Disturb for a specific event or location
- Using the VIP feature to receive calls from specific people
- Enabling Do Not Disturb for Specific Apps
- Accessing the Settings app
- Selecting the desired app from the notification settings
- Toggling on the Do Not Disturb option for that app
- Customizing further app-specific Do Not Disturb settings
- Troubleshooting Do Not Disturb Issues
- Do Not Disturb not working
- Calls still coming through on Do Not Disturb
- Notifications not being silenced during Do Not Disturb
- Do Not Disturb interfering with other features
- Conclusion
How to Enable Do Not Disturb on iPhone
Understanding Do Not Disturb on iPhone
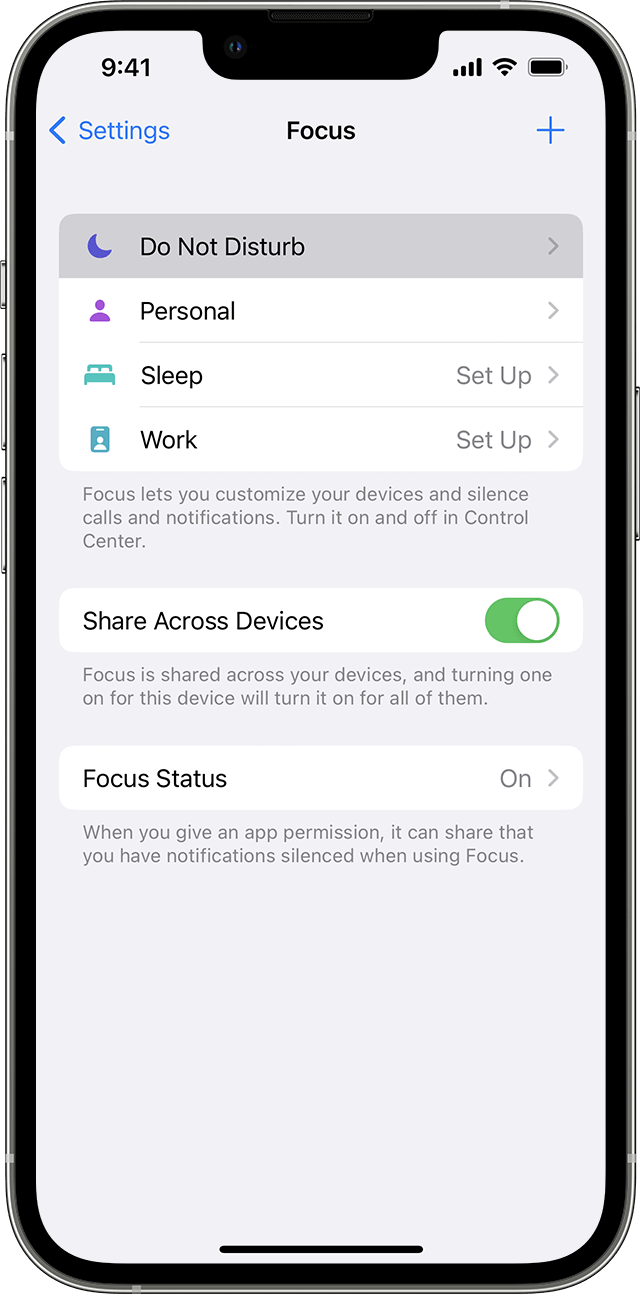
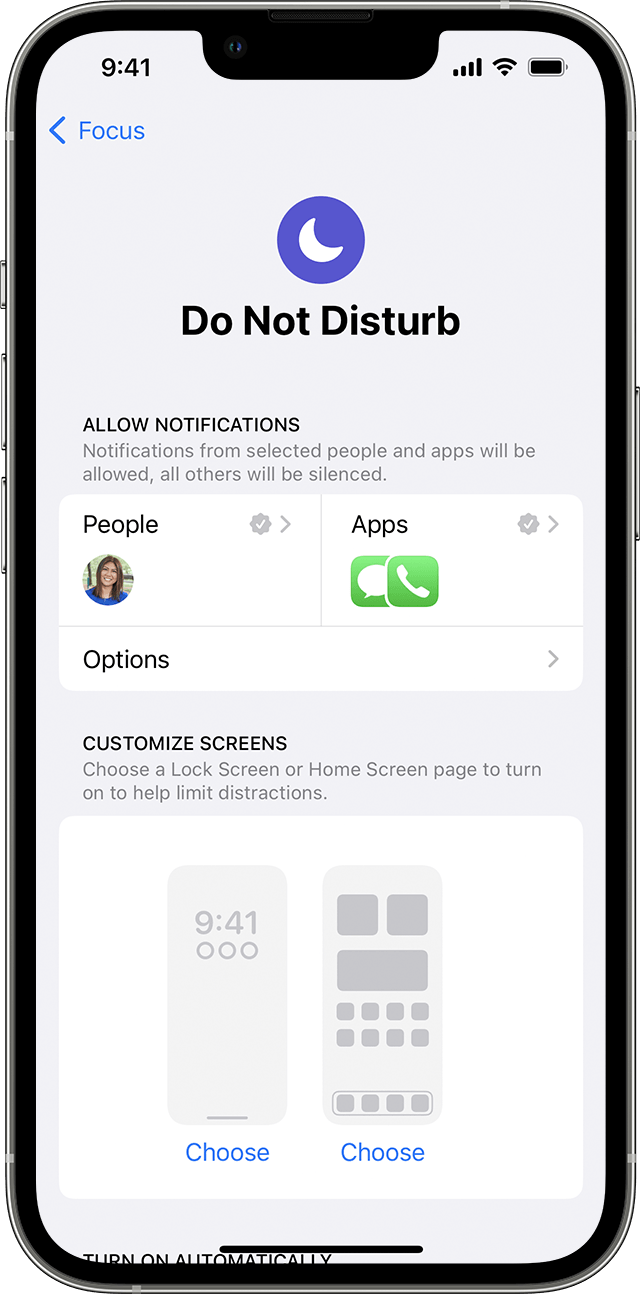
Do Not Disturb is a feature on your iPhone that allows you to silence calls, notifications, and alerts. It’s a convenient way to enjoy uninterrupted usage of your iPhone, whether you’re working, sleeping, or simply want some peace and quiet. Do Not Disturb can be customized to fit your needs, and it offers various settings and options to help you manage your notifications effectively.
Benefits of using Do Not Disturb
Enabling Do Not Disturb on your iPhone has several benefits. Firstly, it allows you to focus and concentrate without being constantly interrupted by calls and notifications. This is particularly useful when you’re in an important meeting, studying, or trying to get some work done. Secondly, Do Not Disturb ensures that you can have a restful night’s sleep without being disturbed by unexpected phone calls or messages. Additionally, it helps reduce distractions and improve productivity by allowing you to prioritize your tasks and avoid unnecessary interruptions.
Difference between silent mode and Do Not Disturb
While both silent mode and Do Not Disturb on your iPhone silence incoming calls and notifications, there is a significant difference between the two features. Silent mode simply mutes your device, meaning calls and notifications will still display on your screen and may cause distractions. On the other hand, Do Not Disturb not only silences your iPhone but also prevents notifications from appearing on your lock screen, ensuring a truly interruption-free experience.
Enabling Do Not Disturb on iPhone
Accessing the Control Center
To enable Do Not Disturb on your iPhone, start by accessing the Control Center. To do this, swipe down from the top-right corner of the screen on iPhone X or newer models. On older models, swipe up from the bottom of the screen.
Locating the Do Not Disturb icon
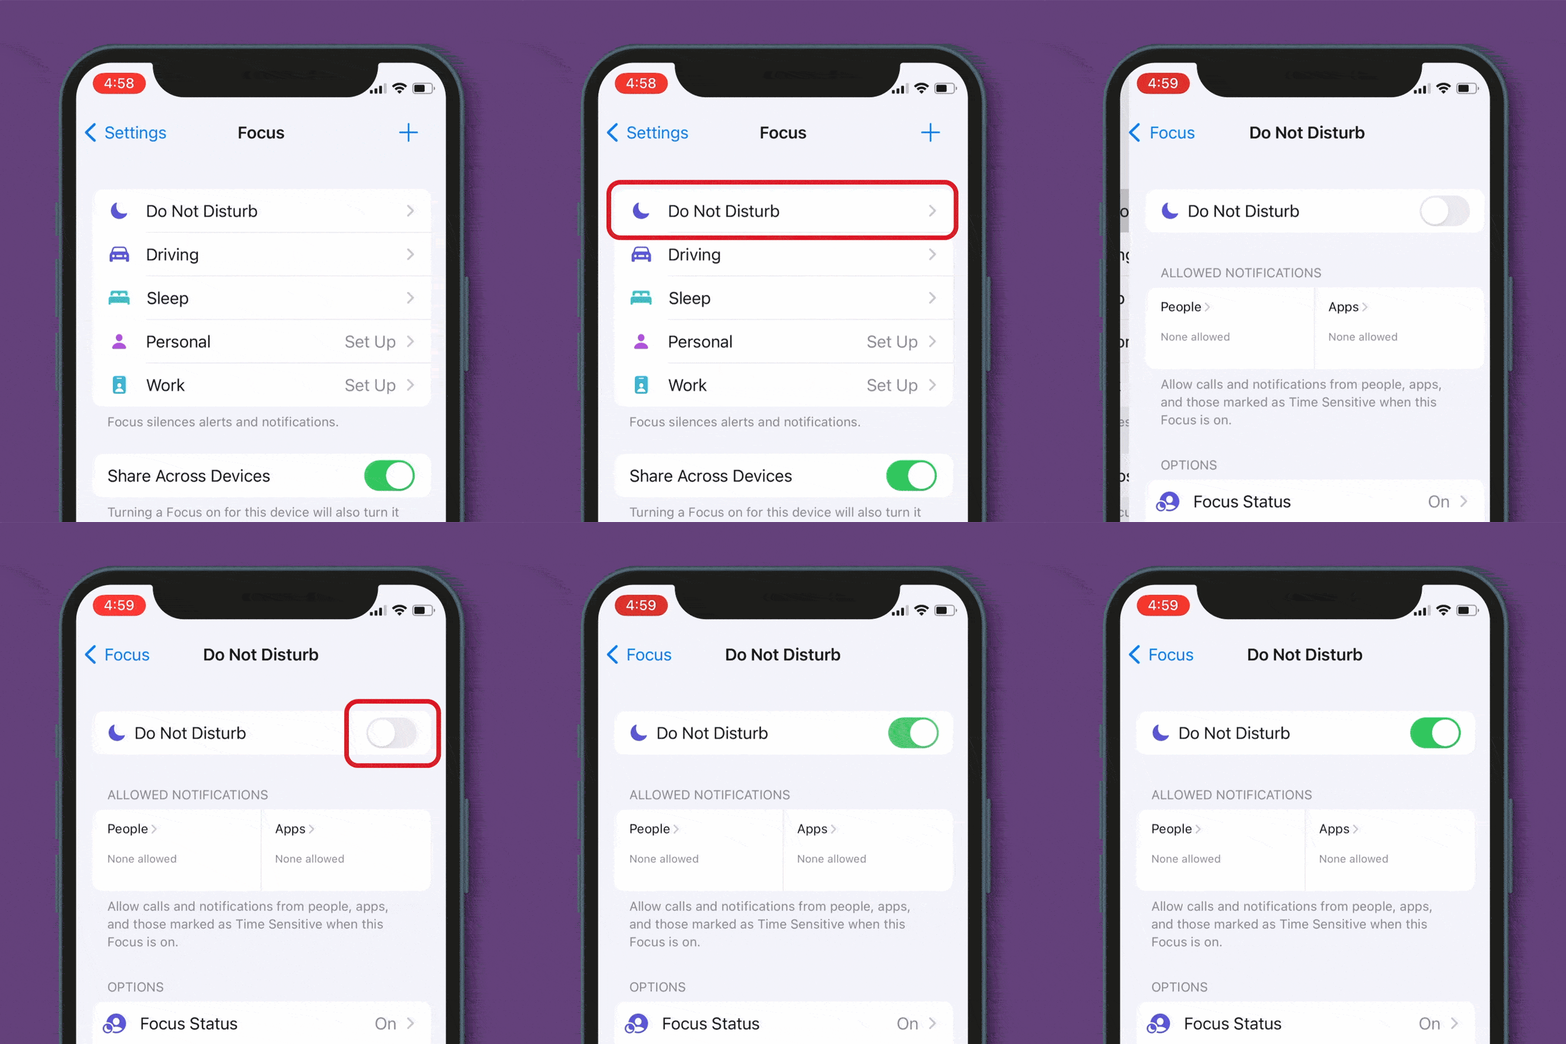
Once you’re in the Control Center, look for the crescent moon icon. This icon represents Do Not Disturb. If the icon is highlighted or illuminated, it means that Do Not Disturb is already enabled. If it’s not highlighted, it means that Do Not Disturb is currently disabled.
Enabling Do Not Disturb temporarily
To enable Do Not Disturb temporarily, simply tap on the crescent moon icon in the Control Center. You’ll see a small crescent moon icon appear in the status bar, indicating that Do Not Disturb is active. This setting will remain enabled until the next day, or until you manually disable it.
Enabling Do Not Disturb indefinitely
If you want to enable Do Not Disturb indefinitely, follow these steps:
- Open the Settings app on your iPhone.
- Scroll down and tap on “Do Not Disturb.”
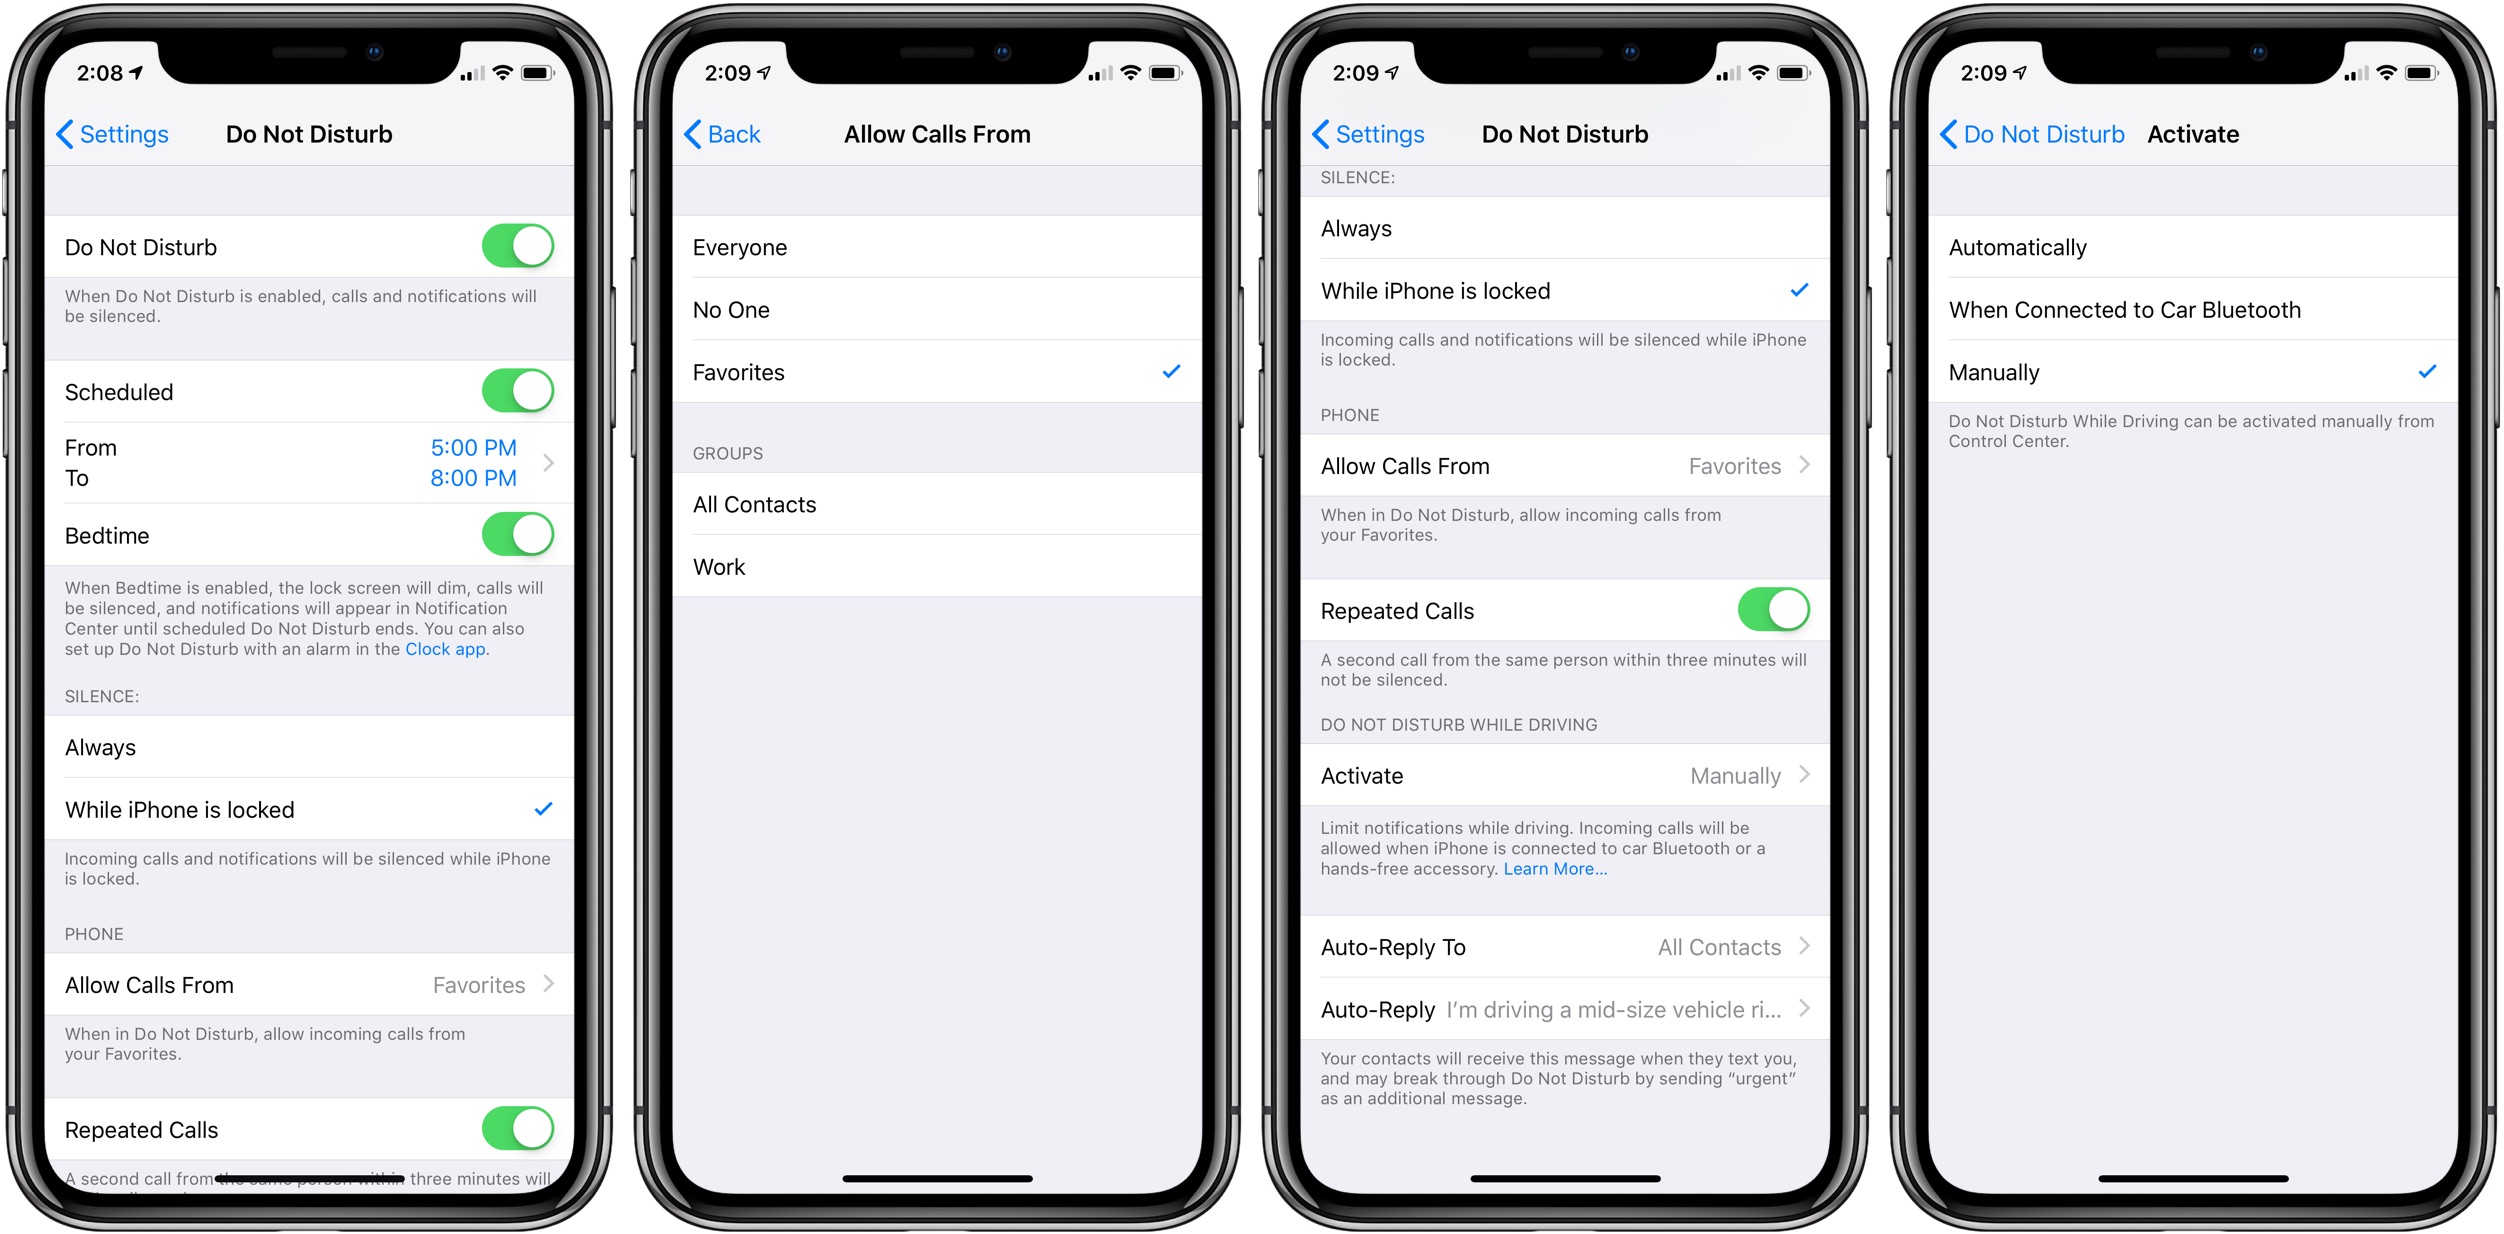
- Toggle on the “Scheduled” option.
- Tap on “From” and select the start time for Do Not Disturb.
- Tap on “To” and select the end time for Do Not Disturb.
Once you’ve set the schedule, your iPhone will automatically enable and disable Do Not Disturb during the specified times.

Customizing Do Not Disturb Settings
Setting a schedule for Do Not Disturb
To set a schedule for Do Not Disturb:
- Open the Settings app on your iPhone.
- Scroll down and tap on “Do Not Disturb.”
- Toggle on the “Scheduled” option.
- Tap on “From” and select the start time.
- Tap on “To” and select the end time.
By customizing the schedule, you can ensure that Do Not Disturb automatically activates and deactivates at specific times that suit your needs.
Allowing calls from specific contacts
If you don’t want to miss important calls while Do Not Disturb is enabled, you have the option to allow calls from specific contacts. To do this:
- Open the Settings app on your iPhone.
- Scroll down and tap on “Do Not Disturb.”
- Scroll down to the “Phone” section and tap on “Allow Calls From.”
- Select “Favorites” to allow calls from your favorite contacts, or choose “Groups” and select specific groups to allow calls from.
This customization ensures that important calls get through even when Do Not Disturb is active.
Allowing repeated calls to bypass Do Not Disturb
If you’re concerned about emergencies or urgent matters that may require repeated calls, you can enable the “Repeated Calls” option:
- Open the Settings app on your iPhone.
- Scroll down and tap on “Do Not Disturb.”
- Scroll down to the “Phone” section and toggle on “Repeated Calls.”
With this setting enabled, if a person calls you twice within three minutes, the second call will not be silenced by Do Not Disturb.
Choosing to receive notifications only from favorites
Do Not Disturb also allows you to receive notifications only from your favorite contacts. To enable this feature:
- Open the Settings app on your iPhone.
- Scroll down and tap on “Do Not Disturb.”
- Scroll down to the “Silence” section and select “Always.”
When this option is enabled, you’ll only receive notifications from those contacts you’ve marked as favorites in your Phone app.
Configuring Do Not Disturb Options
Activating Do Not Disturb while driving
Your iPhone can automatically enable Do Not Disturb while you’re driving to reduce distractions and promote safer driving habits. To enable this feature:
- Open the Settings app on your iPhone.
- Scroll down and tap on “Do Not Disturb.”
- Scroll down to the “Do Not Disturb While Driving” section and select “Activate.”
Your iPhone will now use its sensors to detect when you’re driving and enable Do Not Disturb accordingly.
Enabling Bedtime mode
If you want to create a more peaceful sleep environment, you can enable Bedtime mode in the Clock app on your iPhone. To enable this mode:
- Open the Clock app on your iPhone.
- Tap on the “Bedtime” tab at the bottom of the screen.
- Set your desired wake up time and sleep schedule.
- Toggle on the “Bedtime” switch.
Bedtime mode will automatically activate during your designated sleep hours, ensuring a disturbance-free night’s rest.
Choosing to silence all calls except emergencies
In critical situations, it may be important to still receive calls from certain emergency contacts. To allow emergency calls to bypass Do Not Disturb:
- Open the Settings app on your iPhone.
- Scroll down and tap on “Do Not Disturb.”
- Scroll down to the “Silence” section and toggle on “Emergency Bypass.”
With this setting enabled, calls from emergency contacts will break through Do Not Disturb and ring audibly.
Setting quiet notifications during specific hours
Do Not Disturb allows you to set specific hours during which notifications will be silenced or delivered quietly. To configure this:
- Open the Settings app on your iPhone.
- Scroll down and tap on “Do Not Disturb.”
- Scroll down to the “Silence” section and tap on “Scheduled.”
Here, you can set the hours during which you want your notifications to be quiet, avoiding unnecessary disturbances.

Managing Do Not Disturb Exceptions
Adding emergency contacts to bypass Do Not Disturb
In certain scenarios, you may want specific emergency contacts to bypass Do Not Disturb, ensuring that you receive their calls regardless. To add emergency contacts:
- Open the Contacts app on your iPhone.
- Find the contact you want to add as an emergency contact.
- Tap on the contact to open their details.
- Tap on “Edit” in the top-right corner.
- Scroll down and tap on “Add to Emergency Contacts.”
These emergency contacts will be able to reach you even when Do Not Disturb is enabled.
Allowing repeated calls to ring through
As mentioned earlier, enabling repeated calls allows a second call from the same person within three minutes to ring through Do Not Disturb. This can be particularly useful if someone needs to urgently reach you. However, this feature may also result in unwanted calls bypassing Do Not Disturb.
Configuring Do Not Disturb for a specific event or location
If you have a specific event or location where you want to enable Do Not Disturb automatically, you can create an exception schedule:
- Open the Settings app on your iPhone.
- Scroll down and tap on “Do Not Disturb.”
- Scroll down to the “Event” section and tap on “Add Event” or “Add Location.”
You can set up specific events or locations where Do Not Disturb will be automatically enabled.
Using the VIP feature to receive calls from specific people
The VIP feature allows you to receive calls from specific people even when Do Not Disturb is enabled. To set up VIP contacts:
- Open the Phone or Contacts app on your iPhone.
- Find the contact you want to add as a VIP.
- Tap on the contact to open their details.
- Scroll down and tap on “Add to Favorites” or “Add to VIP.”
Calls from these VIP contacts will always ring through, regardless of Do Not Disturb.
Enabling Do Not Disturb for Specific Apps
Accessing the Settings app
To enable Do Not Disturb for specific apps:
- Open the Settings app on your iPhone.
Selecting the desired app from the notification settings
- Scroll down and tap on “Notifications.”
Toggling on the Do Not Disturb option for that app
- Scroll down and find the app for which you want to enable Do Not Disturb.
- Tap on the app’s name.
Customizing further app-specific Do Not Disturb settings
- Within the app’s notification settings, you may find additional options to enable Do Not Disturb or customize further settings specific to that app.

Troubleshooting Do Not Disturb Issues
Do Not Disturb not working
If Do Not Disturb is not working as expected, try restarting your iPhone and ensuring that the feature is properly enabled in the Settings app.
Calls still coming through on Do Not Disturb
If calls are still coming through while Do Not Disturb is enabled, check your settings to ensure that you haven’t allowed calls from specific contacts or disabled the repeated calls option.
Notifications not being silenced during Do Not Disturb
If notifications are not being silenced during Do Not Disturb, double-check your settings to ensure that you have the correct options enabled. Additionally, make sure that your iPhone is running the latest software updates.
Do Not Disturb interfering with other features
If you find that Do Not Disturb is interfering with other features or causing issues with your iPhone’s performance, try disabling the feature temporarily or adjusting your settings to suit your needs.
Conclusion
Enabling Do Not Disturb on your iPhone offers numerous benefits, allowing you to enjoy uninterrupted usage, focus on important tasks, and get a better night’s sleep. By following the steps outlined above, you can easily enable Do Not Disturb, customize its settings, and manage exceptions to fit your lifestyle. Take control of your notifications, enhance productivity, and reduce distractions with Do Not Disturb on your iPhone.
