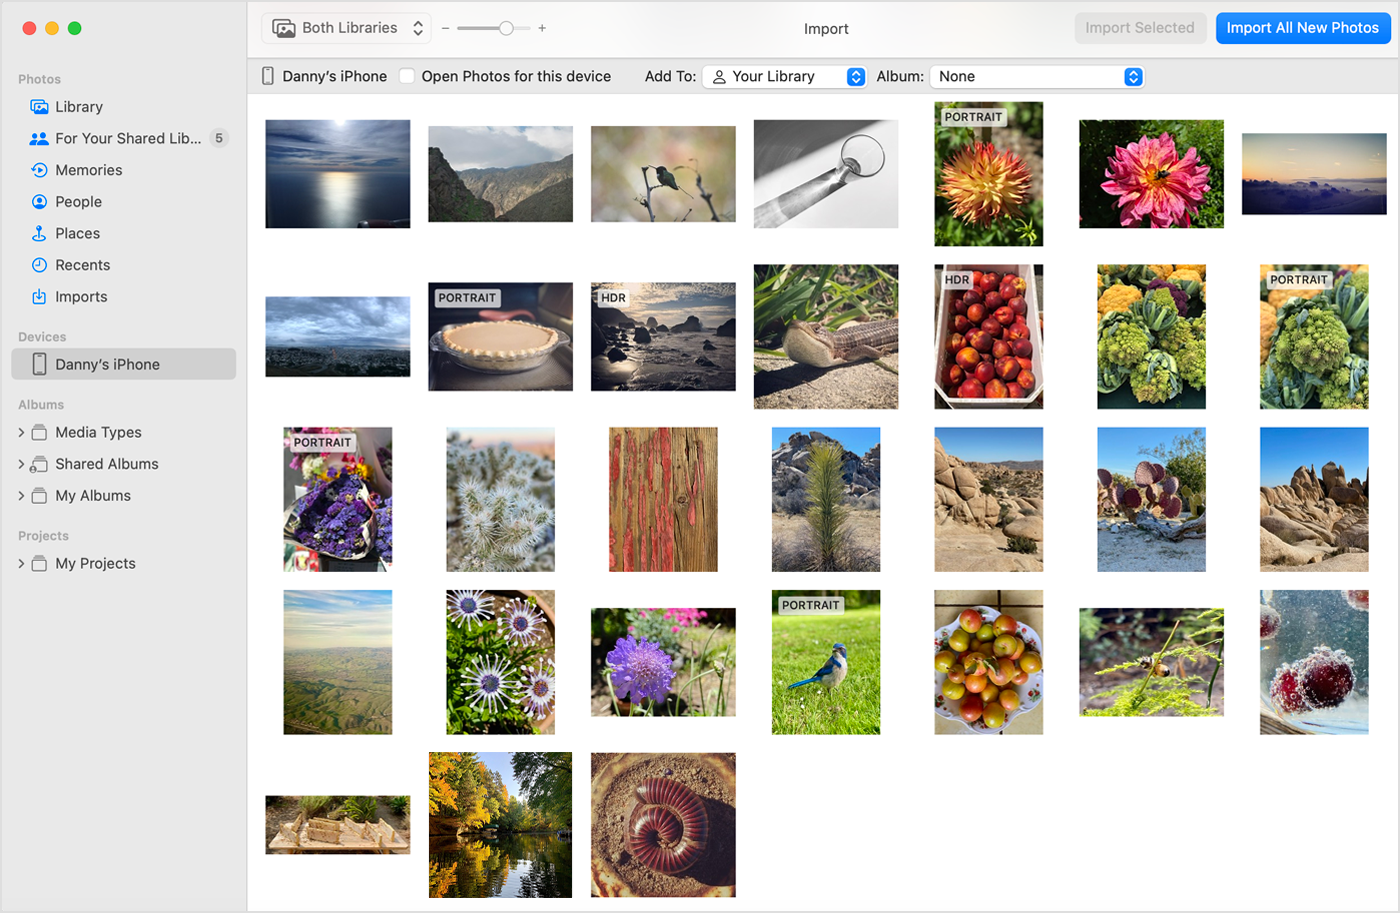
In this article, you will learn how to easily transfer photos from your iPhone to your computer using a USB connection. We will guide you through the step-by-step process, showing you how to connect your iPhone to your computer, access your photos, and copy them onto your computer’s storage. By the end of this article, you will have a clear understanding of how to transfer your iPhone photos to your computer securely and efficiently using a USB cable. So let’s get started!
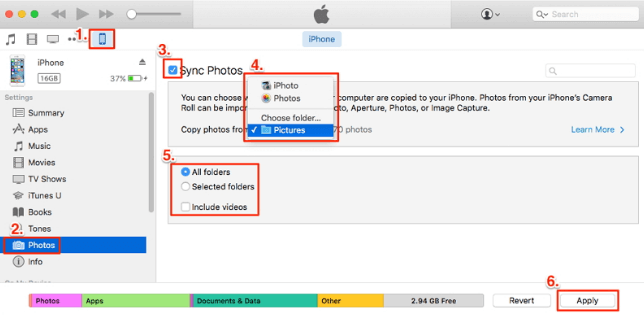
Table of Contents
- Preparing for Transfer
- Check your iPhone and computer compatibility
- Update your iPhone and computer software
- Connect your iPhone to your computer using a USB cable
- Selecting Transfer Method
- Choosing between Automatic and Manual transfer
- Understanding the differences between options
- Selecting Automatic transfer for convenience
- Using Automatic Transfer
- Installing iTunes on your computer
- Setting up synchronization of photos in iTunes
- Enabling Wi-Fi sync for convenience
- Transferring Photos Manually
- Accessing your iPhone photos through File Explorer (Windows) or Finder (Mac)
- Copying and pasting photos to desired computer location
- Organizing transferred photos into folders
- Troubleshooting Common Issues
- Ensuring USB cable is properly connected
- Troubleshooting iTunes errors during transfer
- Resolving compatibility issues between devices
- Using Third-Party Software
- Backing Up iPhone Photos
- Importing photos to a cloud storage service
- Using external hard drives for backup
- Creating multiple backup copies for added security
- Conclusion
Preparing for Transfer
Before you can transfer your photos from your iPhone to your computer using a USB cable, there are a few things you need to do to ensure everything goes smoothly.
Check your iPhone and computer compatibility
The first step is to make sure your iPhone and computer are compatible. Check if your computer is running a compatible operating system. For Windows users, you’ll need Windows 7 or later, and for Mac users, you’ll need OS X 10.10.5 or later.
Additionally, ensure that your iPhone is a model that supports USB transfer. Most modern iPhones support this feature, but it’s always a good idea to check.
Update your iPhone and computer software
To minimize any potential compatibility issues, it’s always a good idea to update both your iPhone and computer software to the latest versions. This will ensure that you have the most up-to-date features and bug fixes for a smoother transfer process.
On your iPhone, go to the Settings app, select General, and then Software Update. If an update is available, follow the prompts to download and install it.
On your computer, check for updates through the system’s settings. For Windows users, open the settings menu and select “Update & Security.” For Mac users, click on the Apple menu, select “System Preferences,” and then “Software Update.”
Connect your iPhone to your computer using a USB cable
Once you’ve verified compatibility and updated your software, it’s time to connect your iPhone to your computer using a USB cable.
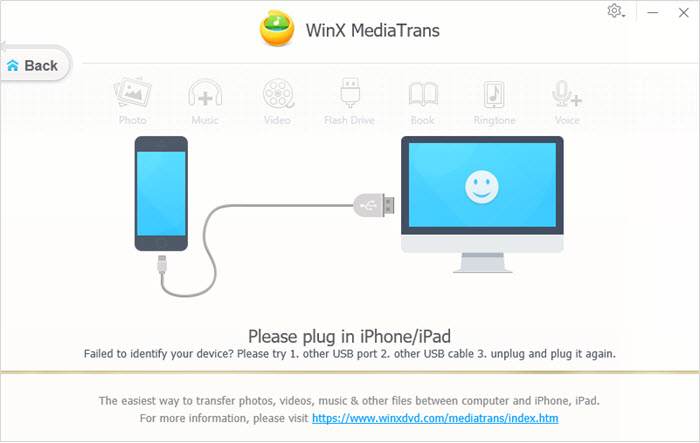
Locate the USB cable that came with your iPhone or use a certified third-party cable. Plug one end into your iPhone’s charging port and the other end into an available USB port on your computer.
Selecting Transfer Method
When it comes to transferring your photos, you have two main options: automatic and manual transfer. Each method has its advantages and disadvantages, so it’s essential to understand them before making a decision.
Choosing between Automatic and Manual transfer
Automatic transfer is the easiest and most convenient method. It uses Apple’s iTunes software to automatically sync your photos from your iPhone to a selected folder on your computer. This method is recommended for users who want a hassle-free transfer process.
Manual transfer, on the other hand, requires you to manually copy and paste photos from your iPhone to your computer using File Explorer (Windows) or Finder (Mac). This method gives you more control over where your photos are saved and is ideal for users who prefer organization and customization.
Understanding the differences between options
With automatic transfer, iTunes will create a separate folder on your computer to store your photos. The photos will be organized into subfolders by year and month. This makes it easy to browse through your photos and find specific ones.
With manual transfer, you have the flexibility to choose where you want to save your photos on your computer. You can create custom folders and organize your photos by event, location, or any other criteria you prefer. However, manual transfer can be more time-consuming, especially if you have a large number of photos.
Selecting Automatic transfer for convenience
For most users, automatic transfer is the recommended option. It simplifies the transfer process and ensures that your photos are safely backed up on your computer. Plus, the organized folder structure makes it easy to locate specific photos.
To use automatic transfer, you’ll need to install iTunes on your computer if you haven’t already done so.
Using Automatic Transfer
To transfer your photos from your iPhone to your computer using automatic transfer, follow these steps:
Installing iTunes on your computer
Go to the Apple website and download the latest version of iTunes for your operating system. Once the download is complete, run the installer and follow the on-screen instructions to complete the installation.
Setting up synchronization of photos in iTunes
Open iTunes on your computer and connect your iPhone using the USB cable. Your iPhone should appear as a device in iTunes.
Click on the device icon in the upper left corner of the iTunes window. Then, click on the “Photos” tab in the left-hand sidebar.
Check the box next to “Sync Photos” and choose the folder or application you want to sync your photos from. If you want to sync your entire photo library, select “All folders” or “All photos and albums.” If you only want to sync specific albums, select “Selected folders” or “Selected albums” and choose the albums you want to sync.
Enabling Wi-Fi sync for convenience
To make the transfer process even more convenient, you can enable Wi-Fi sync on your iPhone. This allows you to sync your photos to your computer without needing to connect your iPhone via USB every time.
To enable Wi-Fi sync, disconnect your iPhone from your computer and go to the “General” section in the Settings app on your iPhone. Scroll down and select “iTunes Wi-Fi Sync.” Tap on the “Sync Now” button to start the synchronization process.
Once Wi-Fi sync is enabled, your iPhone will automatically sync with your computer whenever it’s connected to the same Wi-Fi network and plugged into a power source.
Transferring Photos Manually
If you prefer to transfer your photos manually, follow these steps:
Accessing your iPhone photos through File Explorer (Windows) or Finder (Mac)
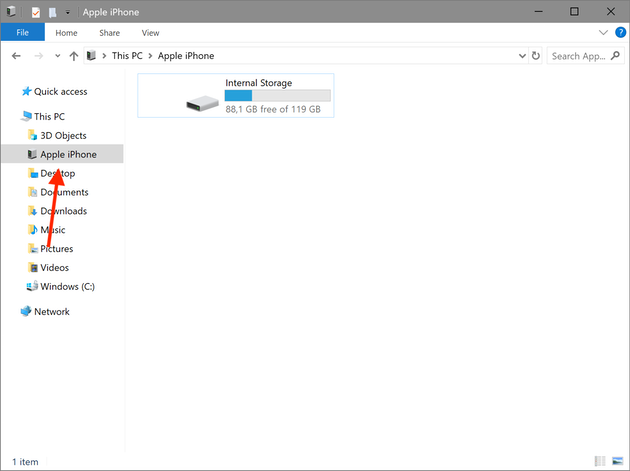
Connect your iPhone to your computer using the USB cable. On a Windows computer, open File Explorer and look for your iPhone under “This PC” or “Devices and Drives.” On a Mac, open Finder and look for your iPhone under “Locations” or “Devices.”
Click on your iPhone and navigate to the “DCIM” folder. This is where your iPhone stores your photos.
Copying and pasting photos to desired computer location
Once you’ve located your photos, select the ones you want to transfer by holding down the Ctrl key (Windows) or Command key (Mac) and clicking on each photo. Right-click on the selected photos and choose “Copy” from the context menu.
Navigate to the desired location on your computer where you want to save the photos. Right-click and choose “Paste” to copy the photos to that location.
Organizing transferred photos into folders
To keep your transferred photos organized, create folders on your computer and move the photos into their respective folders. You can create folders based on dates, events, or any other criteria you prefer. This will make it easier to find specific photos in the future.
Troubleshooting Common Issues
During the transfer process, you may encounter some common issues. Here are a few troubleshooting tips:
Ensuring USB cable is properly connected
Double-check that your USB cable is securely plugged into both your iPhone and your computer. Try disconnecting and reconnecting the cable to ensure a proper connection.
Troubleshooting iTunes errors during transfer
If you encounter any errors or issues while using iTunes for automatic transfer, try restarting both your iPhone and computer. You can also try updating iTunes to the latest version to resolve any compatibility issues.
Resolving compatibility issues between devices
If you’re having trouble accessing your iPhone’s photos on your computer, make sure both devices are running compatible software versions. Update your iPhone and computer software if necessary.
Using Third-Party Software
If you prefer not to use iTunes or are looking for alternative options, there are several third-party software programs available for transferring photos from your iPhone to your computer. Some popular options include EaseUS MobiMover, iMazing, and AnyTrans.
Before using any third-party software, do your research to ensure it’s trusted and reliable. Read reviews, compare features, and choose a program that best fits your needs.
Once you’ve selected a third-party software, follow the provided instructions to transfer your photos. The process may vary depending on the software you choose, so be sure to refer to the user guide or online tutorials for assistance.
Backing Up iPhone Photos
Transferring your photos from your iPhone to your computer is an important step in ensuring their safety. However, it’s also a good idea to create backup copies of your photos for added security.
Importing photos to a cloud storage service
One option is to import your photos to a cloud storage service such as iCloud, Google Drive, or Dropbox. These services allow you to store your photos online and access them from any device with an internet connection.
To import your photos to a cloud storage service, install the app on your iPhone, sign in to your account, and follow the on-screen prompts to upload your photos. Once your photos are uploaded, you can access them from your computer by logging in to the cloud storage service’s website or using the desktop app.
Using external hard drives for backup
Another option is to use an external hard drive to back up your photos. External hard drives are portable and provide additional storage space for your photos.
Connect the external hard drive to your computer and follow the manufacturer’s instructions to set it up. Once it’s recognized by your computer, you can manually transfer your photos to the external hard drive by copying and pasting them.
Creating multiple backup copies for added security
To ensure your photos are adequately backed up, consider creating multiple copies. This can be done by using a combination of cloud storage services, external hard drives, and even DVDs.
By having multiple backup copies, you decrease the risk of losing your photos in case of a hardware failure, accidental deletion, or other unforeseen circumstances.
Conclusion
Transferring photos from your iPhone to your computer using a USB cable is a straightforward process that can be done through automatic or manual transfer methods. By following the steps outlined in this guide, you’ll be able to safely transfer and backup your precious memories, ensuring they are accessible whenever you need them. Whether you choose automatic transfer through iTunes or opt for manual transfer using File Explorer or Finder, the choice is yours. So go ahead, transfer those photos, and free up some space on your iPhone while keeping your memories safe and secure.
